Building Complex Business Agent Assistants through Workflow
In SERVICEME NEXT, Agents created using the basic method are more suitable for simple Q&A scenarios with relatively limited functionality. To handle more complex business logic or implement multi-step operations, you can build advanced Agents through Workflow, meeting richer business requirements.
This chapter will demonstrate how to build complex processes using Workflow through a concrete example.
Scenario Example: Sensitive Word Extraction from Contract Content
In actual business, contract texts are usually lengthy and complex. Manually comparing and identifying whether they contain sensitive words is not only time-consuming and labor-intensive but also prone to omissions, especially when the number of sensitive words is large, making accuracy harder to guarantee.
With the help of Workflow capabilities, you can build an intelligent Agent that supports file upload, content parsing, sensitive word recognition, and annotation, automatically completing the following operations:
- Receiving contract files uploaded by users;
- Automatically parsing the text content;
- Detecting and extracting sensitive words within;
- Returning results containing sensitive words and their locations.
Through this process, users can quickly understand sensitive information in contracts without manual review, greatly improving audit efficiency and accuracy.
✅ Tip: Such Agents are especially suitable for scenarios like legal review, content auditing, and compliance management.
Preparing Sensitive Word Data Source
Before formally building the workflow, you need to prepare the sensitive word data. In this case, sensitive words are stored in a database, so you need to add the database as a data source through the Data module and complete data synchronization.
Data Preparation Prerequisites
- Sensitive word data has been written into the database (table name
SensitiveWords). - The database type is
SQLServerand is accessible via the network.

Steps to Add Data Source
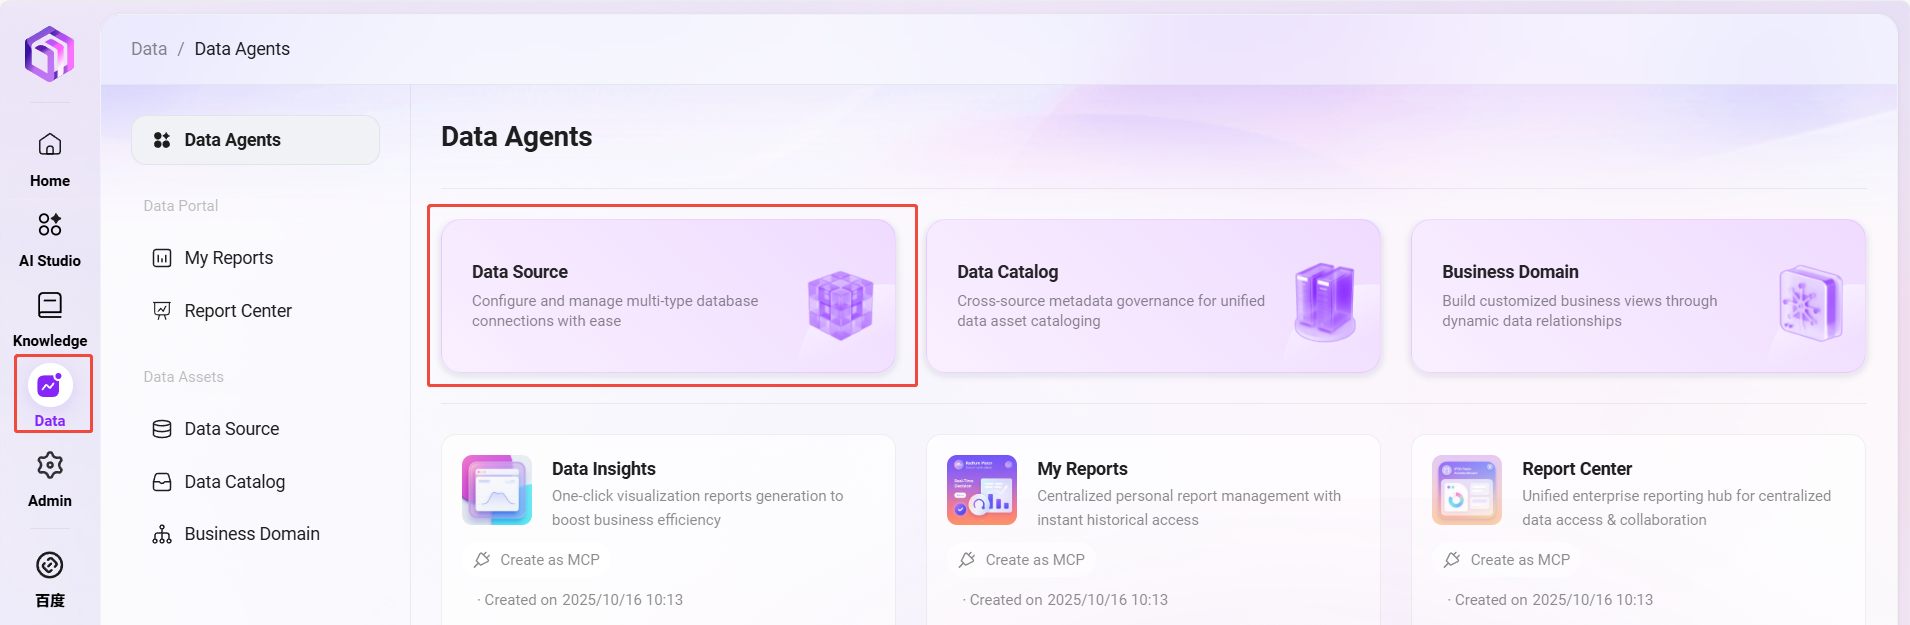
- Enter the Data Module
- Open the SERVICEME platform and click “Data” in the left navigation bar.
- Select “Data Sources” to enter the data source management page.
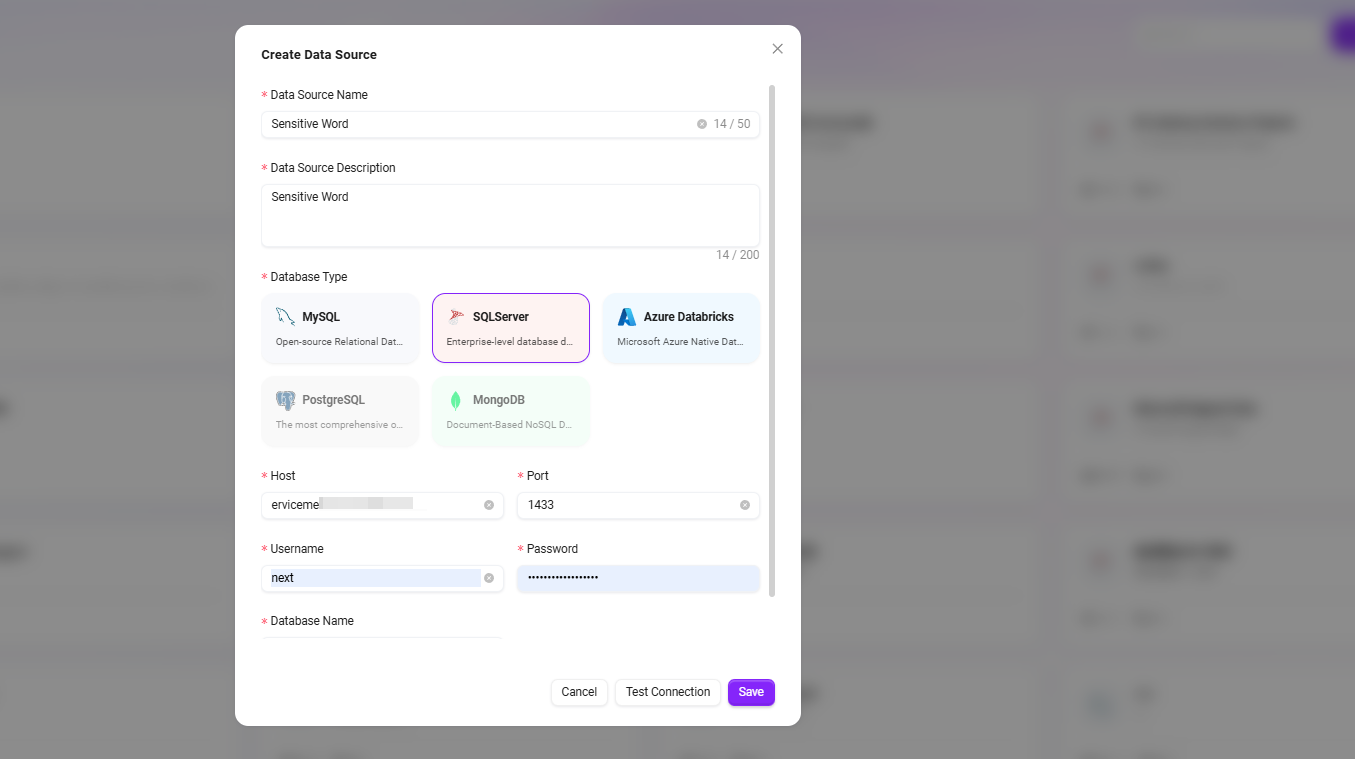
- Add Data Source
- Click the “Add Data Source” button at the top right.
- In the pop-up configuration window, fill in the following information:
- Data Source Name: e.g.,
Sensitive Word - Database Type: select
SQLServer - Connection Information: including
host,port,username,password,database name
- Data Source Name: e.g.,
- Click “Test Connection”, and after confirming success, click “Confirm” to complete the addition.
- Select Data Table
- Return to the data source list and click the newly created data source item.
- The system will display available tables in the database; check the table containing sensitive words (e.g.,
SensitiveWords) and click “Confirm” to add.
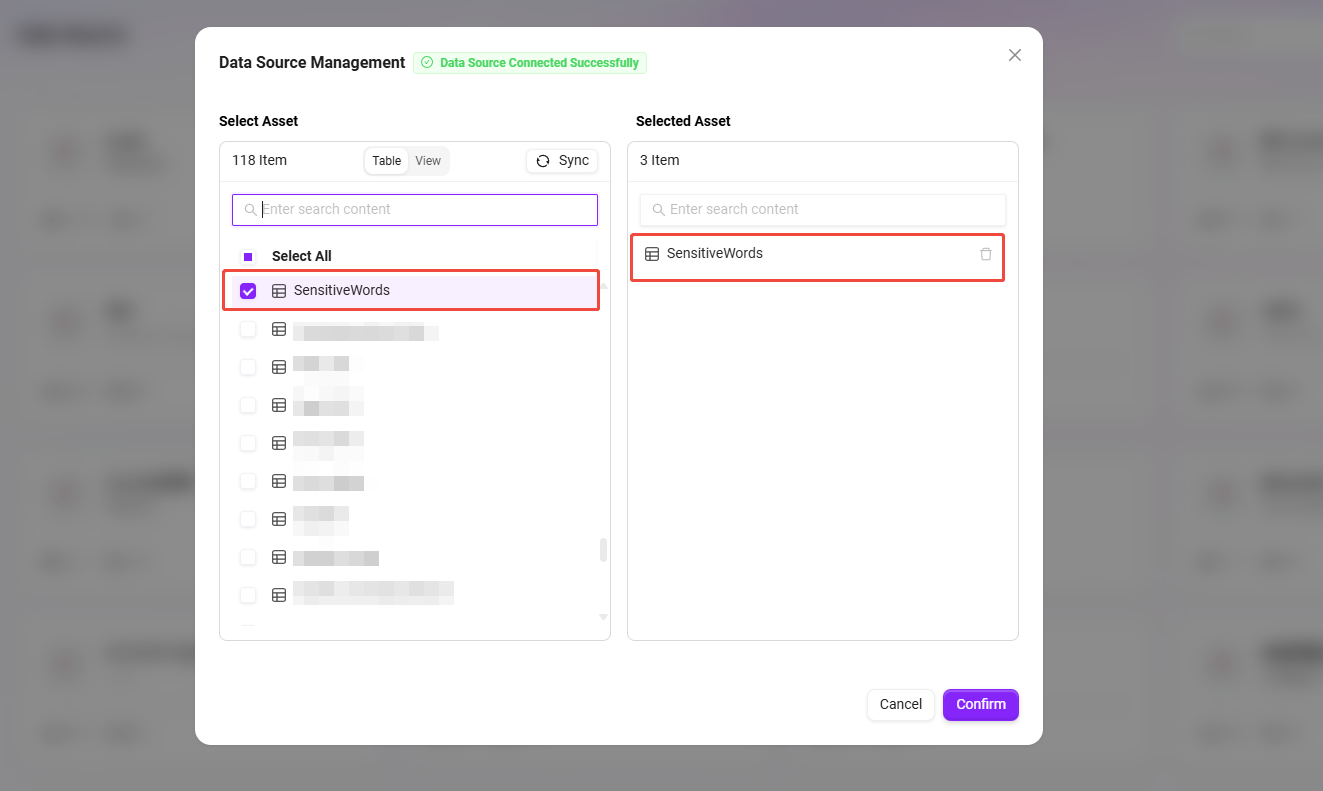
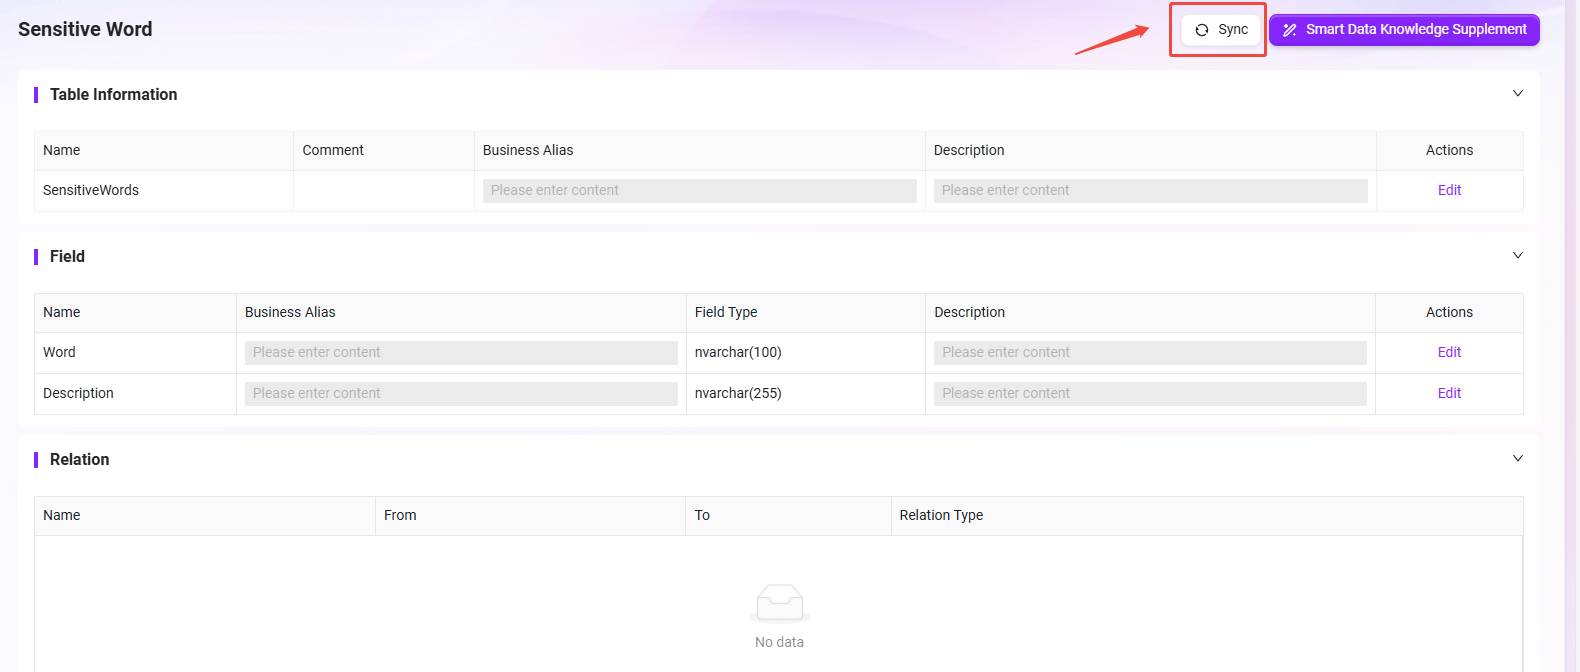
- Data Catalog Synchronization
- In the left menu, select “Data Catalog”, find and click the
Sensitive Worddata source. - Perform the “Sync” operation to ensure the platform obtains the latest data.
- In the left menu, select “Data Catalog”, find and click the
After completing the above steps, the sensitive word data source is configured. In the subsequent workflow, you can access this data table through nodes to achieve sensitive word extraction and comparison in contract content.
Creating the “Sensitive Word Extraction” Agent via Workflow
- Go to the SERVICEME NEXT homepage, click AI Studio in the left navigation bar to enter the Agent interface.
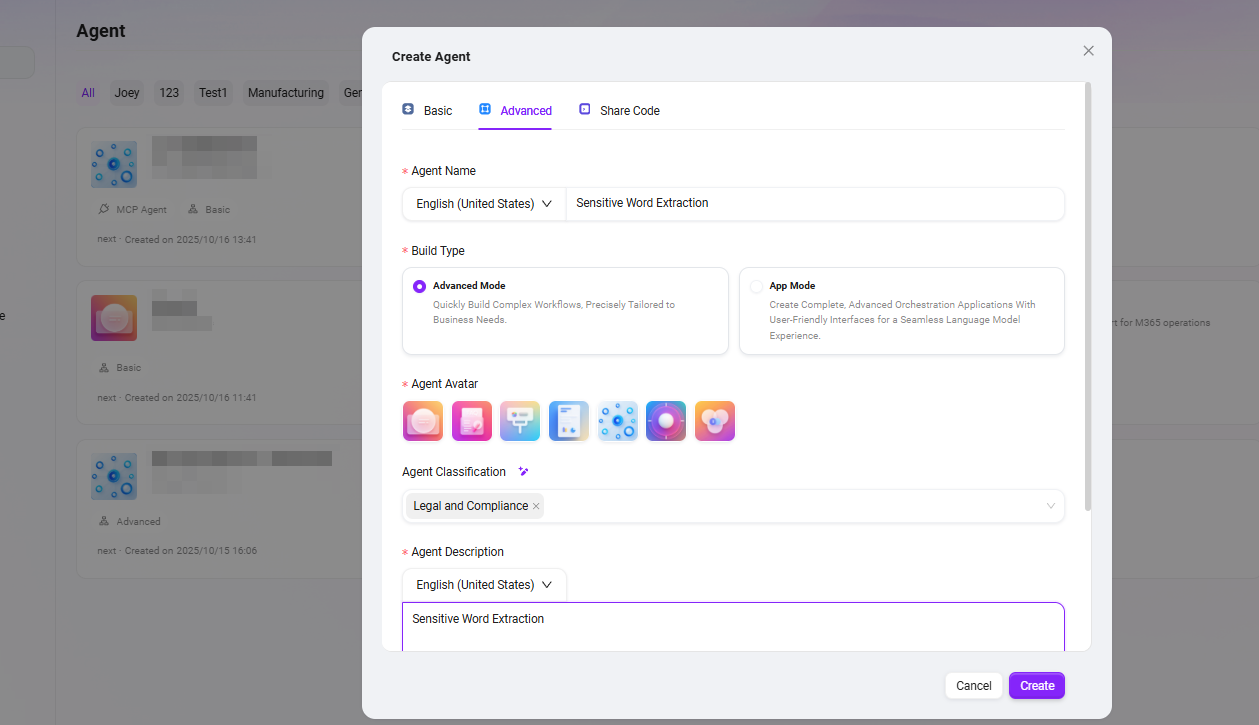
- Click the “Create Assistant” button at the top right and select “Advanced Orchestration Creation”.
- Fill in the following basic information:
- Assistant Name: enter
Sensitive Word Extraction - Agent Avatar: select one from the system built-in avatars (custom upload is currently not supported)
- Category: select the business category, e.g.,
Legal and Compliance - Description: e.g.,
Sensitive Word Extraction
- Assistant Name: enter
- After filling in, click “Create” to successfully generate the workflow Agent.
Configuring the “Sensitive Word Extraction” Agent
📌 Pre-orchestration Thought Process
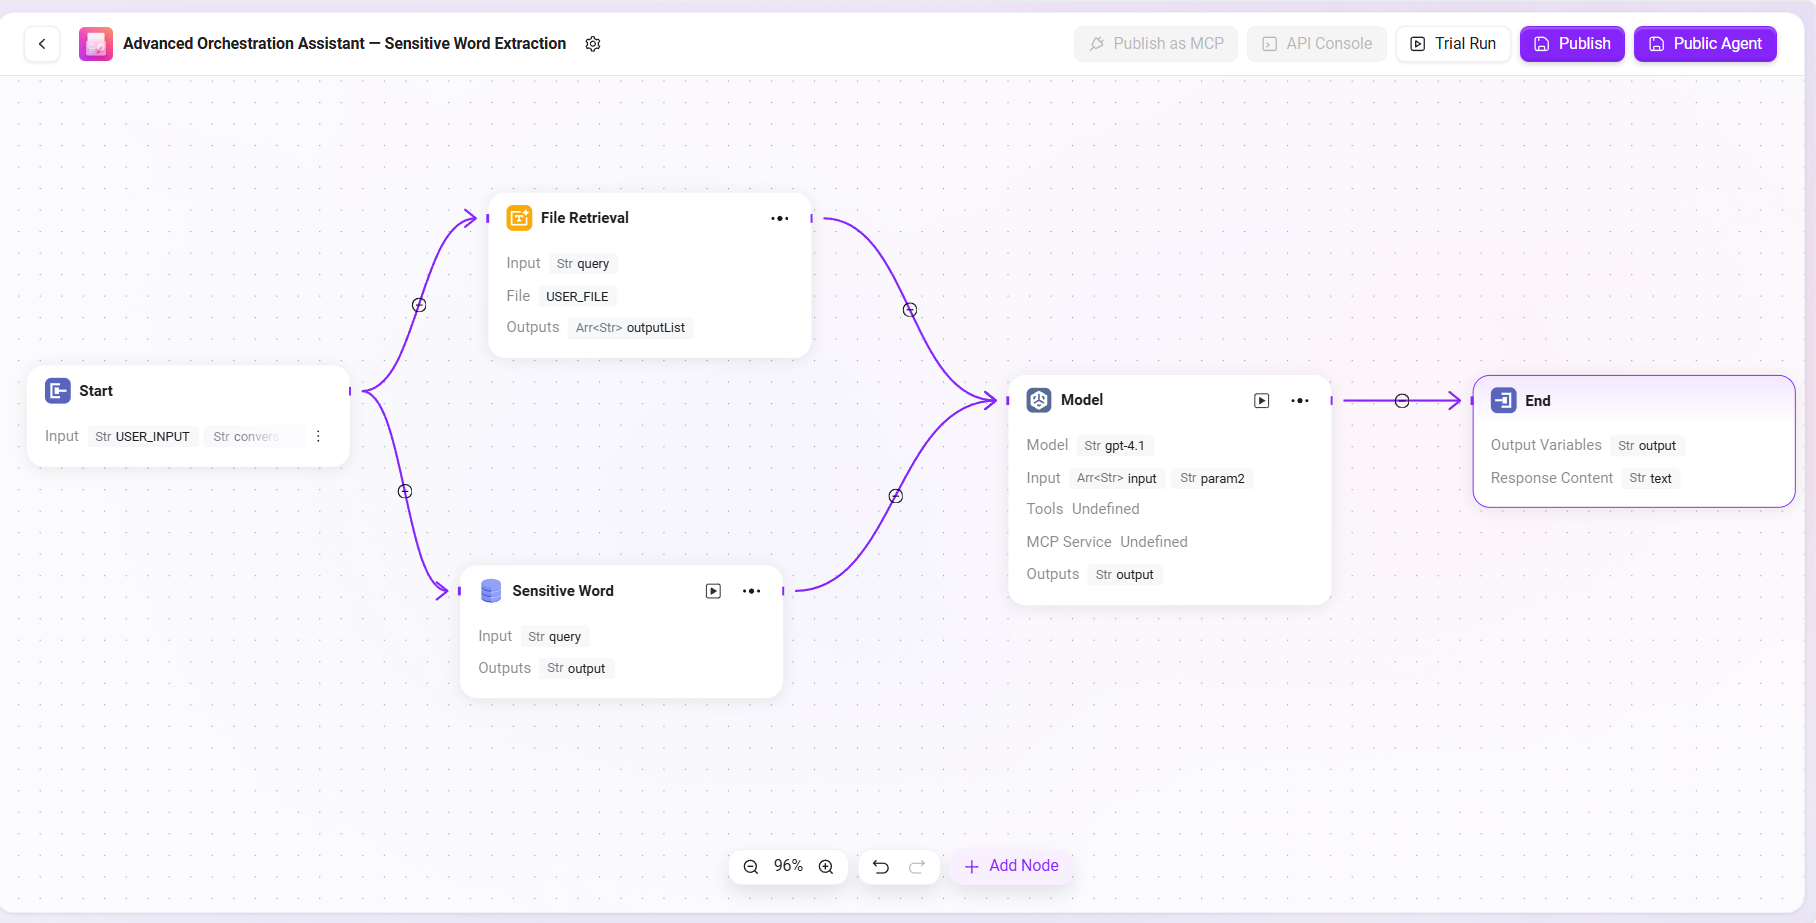
The core goal of this workflow is: enabling the Agent to automatically identify sensitive words present in contract files uploaded by users. To achieve this, we need to guide users to upload contract files and parse their content into processable text; meanwhile, load sensitive word data from the configured database, and use the model to intelligently compare contract content with sensitive words, identifying matches and their positions. Finally, the model outputs the recognition results and returns them to the user. The entire process covers key steps such as file processing, data source invocation, model recognition, and result output, suitable for automated text review business scenarios.
📌 Node Configuration and Connection Explanation
In this Workflow example, each node’s input and output are configured by referencing the results of the previous node. To achieve the goal of sensitive word extraction, the process mainly involves the following nodes: start node, file processing node, data source node, model node, and end node. The configuration and connection methods of each node will be explained in order below.
Configuration Process
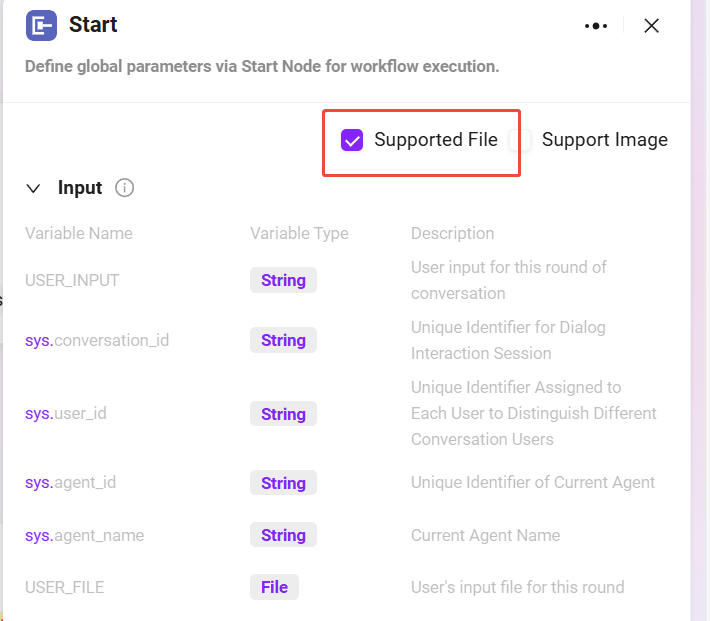
- Start Node Input Description
The start node by default contains two inputs:
USER_INPUT: the user’s natural language instruction, e.g., “Please help me check for sensitive words in the contract.”USER_FILE: the local contract file uploaded by the user.
These two inputs will serve as reference sources for subsequent nodes, used for file processing and model recognition.
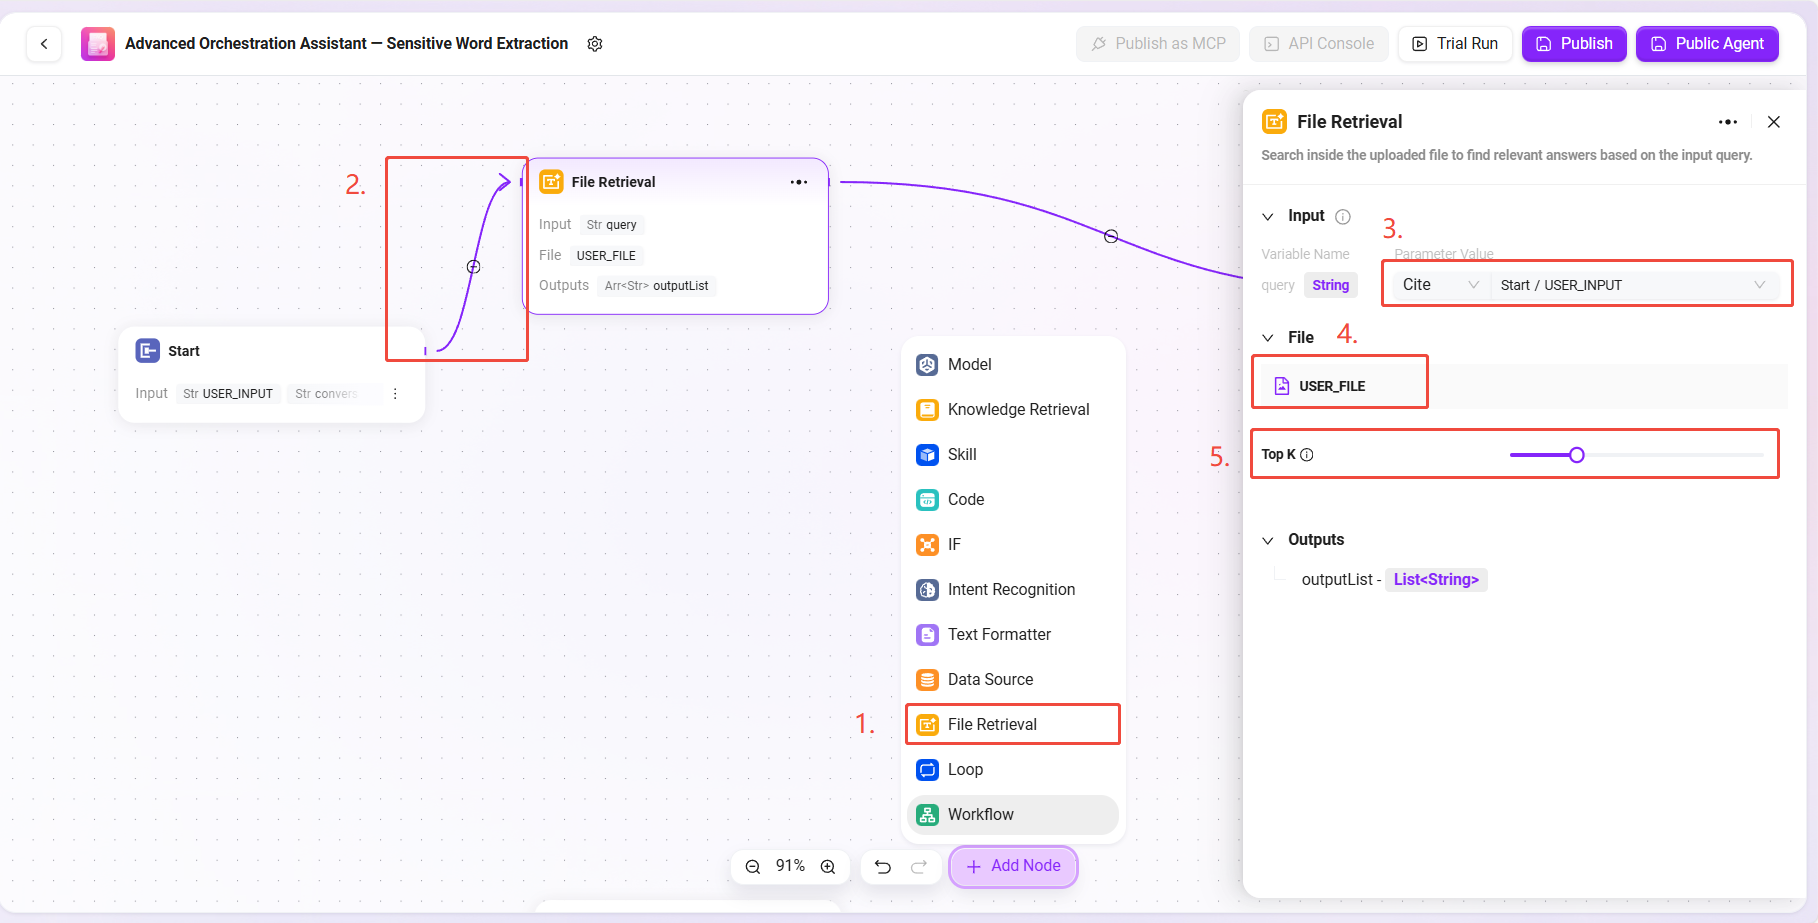
- File Processing Node Configuration
This node is responsible for processing the contract file uploaded by the user, including text extraction, slicing, and vectorization.
Configuration steps:
- Add a File Processing Node to the canvas.
- Connect the Start Node to the File Processing Node.
- Click the file processing node to enter the configuration interface and set the following:
- Input Reference: set
USER_INPUTas a reference, format:
Start/USER_INPUT - File Reference: click “Add File” and select
USER_FILE(the contract file uploaded by the user) - TopK Setting: choose an appropriate TopK (e.g., 3~5).
- TopK indicates the maximum number of text segments returned by the model during vector matching.
- Suggestion: Too low TopK may miss key content; too high may affect the model’s focus ability.
- Input Reference: set
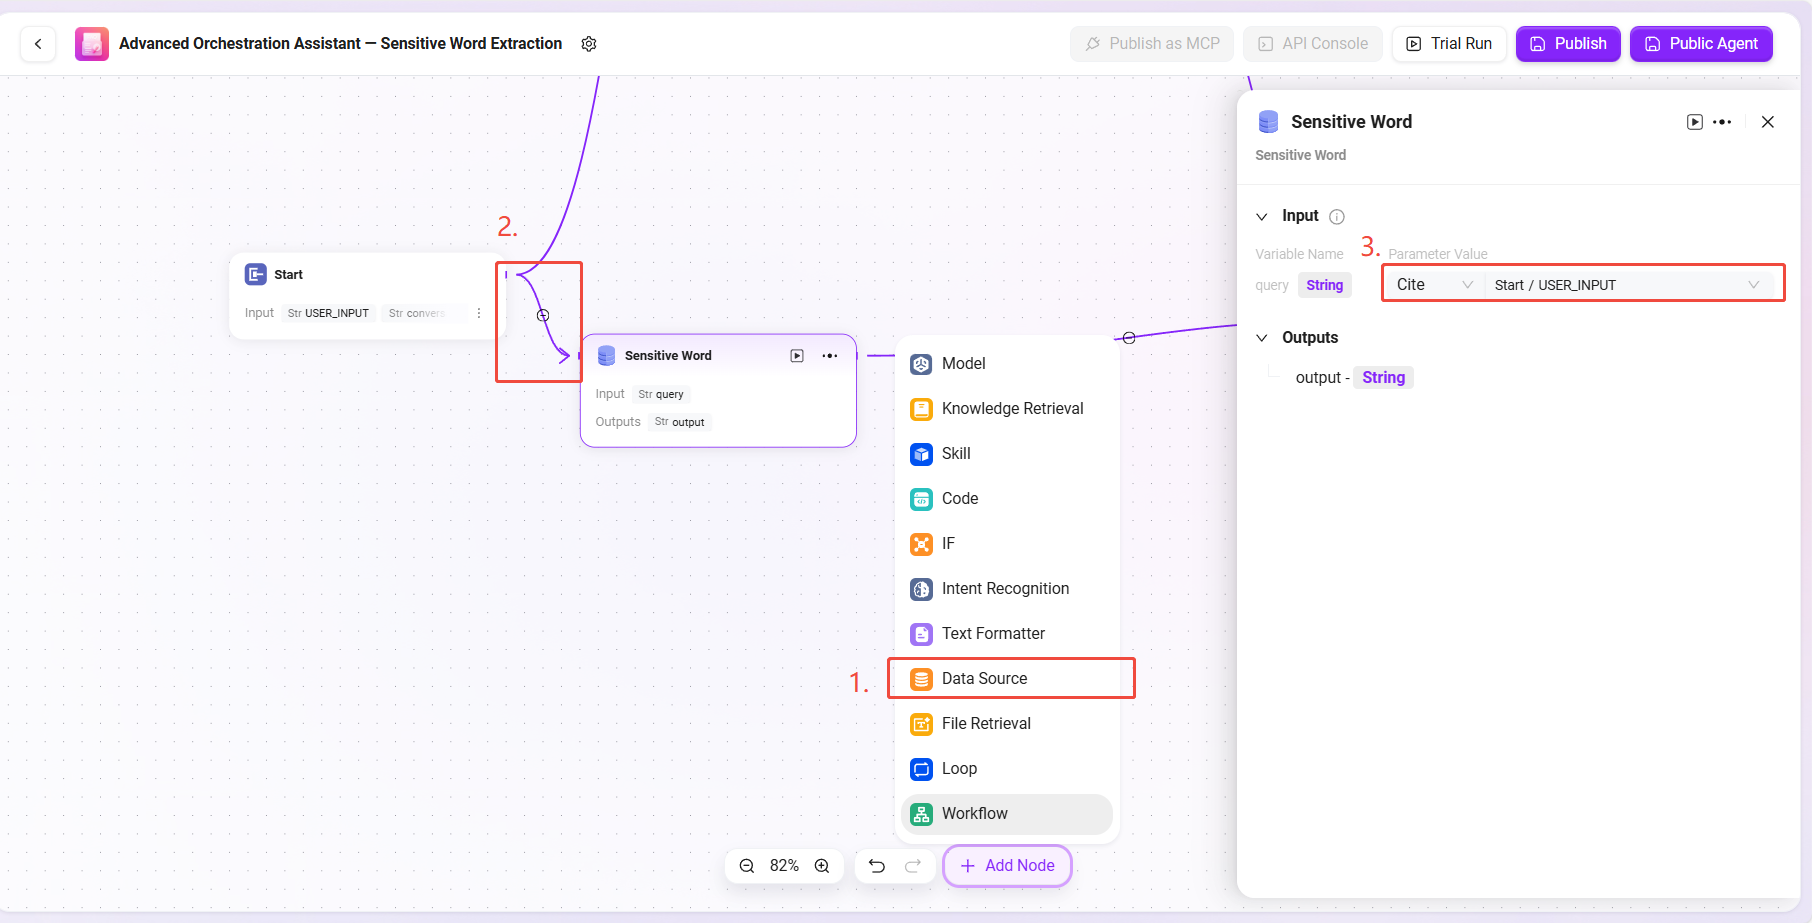
- Data Source Node Configuration
This node is used to introduce the previously created sensitive word data table for subsequent comparison.
Configuration steps:
- Add a Data Source Node to the canvas and connect it to the Start Node.
- Click the node and configure the data source information:
- Select data source:
Sensitive Word - Input reference configuration:
Start/USER_INPUT(user’s input instruction)
- Select data source:
The output of this node is the sensitive word list needed by the model.
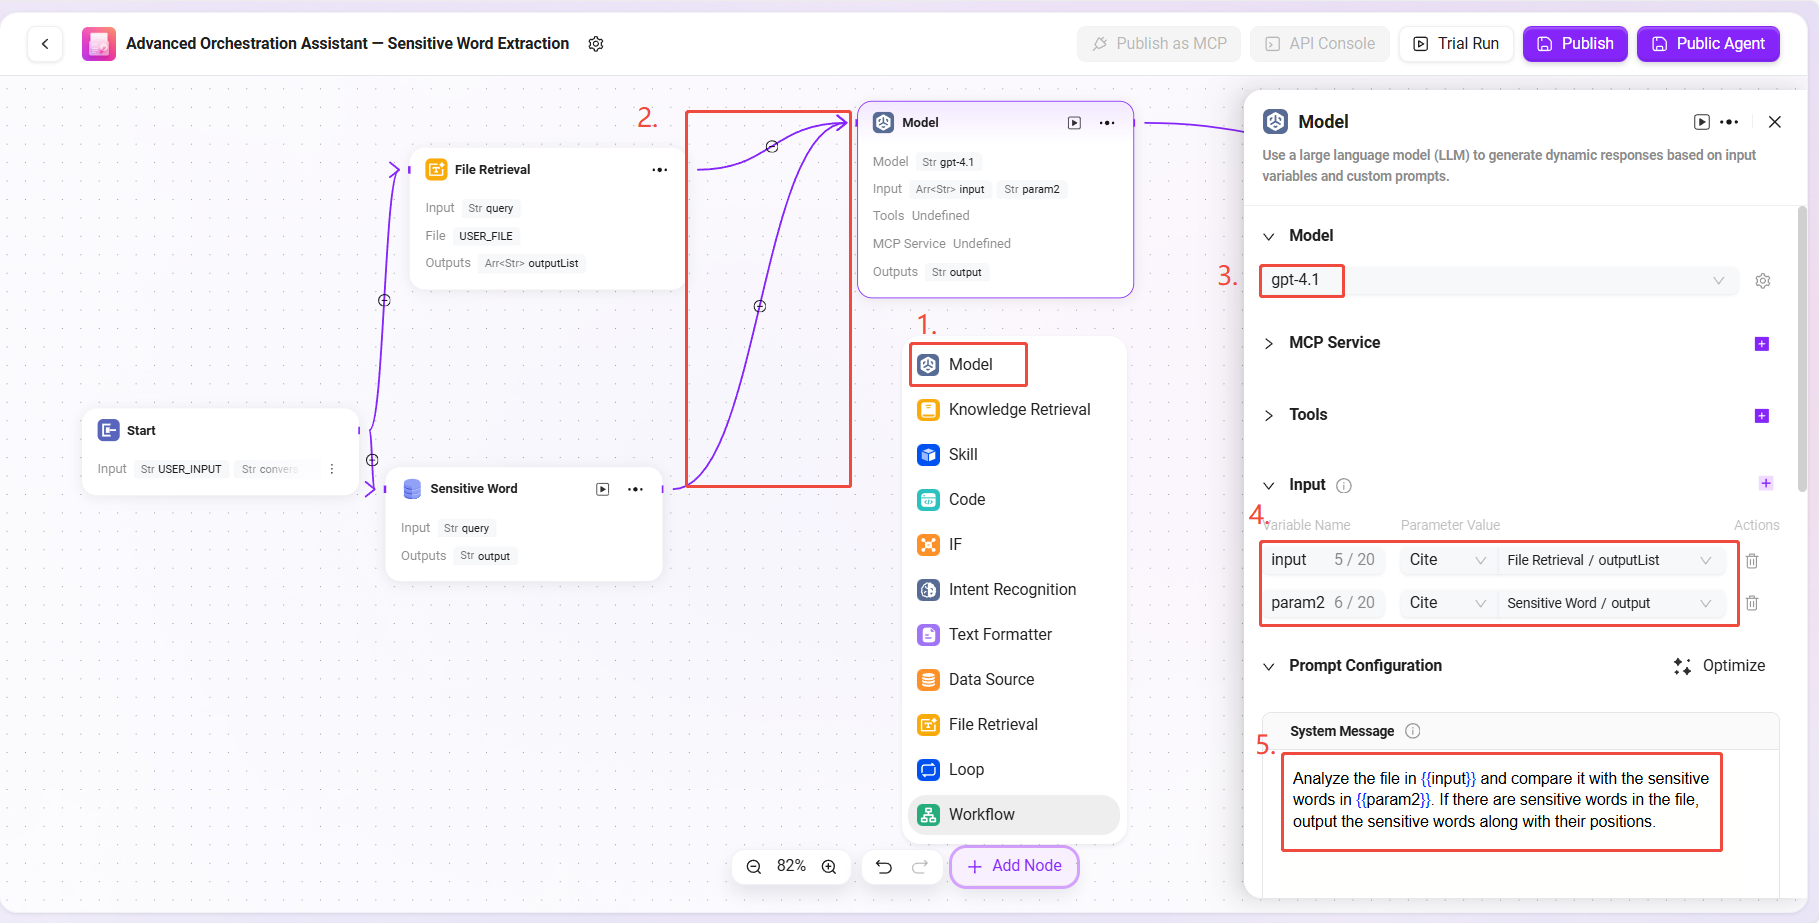
- Model Node Configuration
This node is the core processing module of this workflow, responsible for intelligently comparing contract text with sensitive words and returning results.
Configuration steps:
- Add a Model Node, connecting it to both the file processing node and the data source node.
- Model selection:
gpt-4.1 - Tool selection: no external tools are needed in this scenario, can be skipped.
- Input references:
input: reference the output of the file processing node, format:
FileHandler/outputparam2: reference the output of the data source node, format:
DataSource/output
- Prompt configuration:
- System Message (System Prompt):
Analyze the file in {{input}} and compare it with the sensitive words in {{param2}}. If there are sensitive words in the file, output the sensitive words along with their positions. - User Message (User Prompt):
Analyze the file in {{input}} and compare it with the sensitive words in {{param2}}. If there are sensitive words in the file, output the sensitive words along with their positions.
- System Message (System Prompt):
✅ Tip: The system message provides behavioral instructions to the model, while the user message simulates actual user input. Here, both have the same content for more stable results.
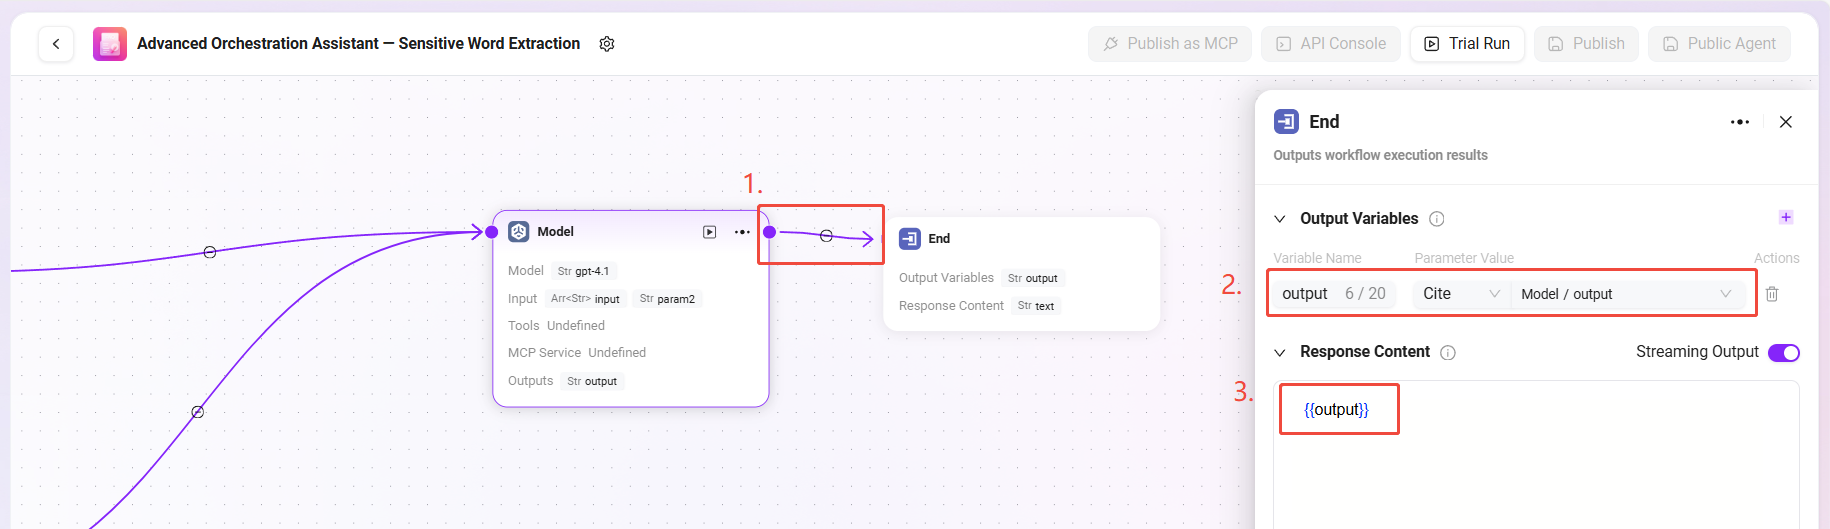
- Output Node Configuration
This node is used to return the model’s processing results to the end user.
Configuration steps:
- Connect the Model Node to the End Node.
- Click the end node and set the input reference:
- Input content: reference the model node output, format:
Model/output
- Input content: reference the model node output, format:
- In the output content configuration, fill in:
{{output}}
✅ Tip: Filling only
{{output}}as the output better preserves the model’s output. If needed, specific content can also be specified.
Complete configuration as follows: